Generally images taken on a Digital SLR Camera will need to have some post-processing done to them. The amount of post-processing really depends on the quality of lens that you use, quality of the image that you have taken, personal preference, and what you intend to use the image for.
You can adjust the 'processing parameters' in a DSLR camera so that the camera automatically adds contrast, sharpness, saturation, and colour tone to the photograph as it is captured but it is generally accepted that it is much better to set the camera's 'processing parameters' to standard and enhance the photograph using image editing software such as 'Photoshop Elements' or 'Paint Shop Pro' to do the post-processing.
Using RAW mode on a DSLR will allow you much more latitude in post-processing with the ability to alter the exposure, white-balance, colour, and sharpness etc. but file-sizes using RAW mode are much larger, meaning less photos can be stored on your memory card, than using Large/Fine JPEG mode. For this article i am going to assume that you have taken a photograph which has good exposure, is sharp, and is taken using Large/Fine JPEG mode (highest quality JPEG mode - not RAW mode).
Firstly it is a good idea to make sure that your monitor is correctly calibrated. A Google search will find many websites that help with software monitor calibration or a hardware calibration device such as the 'Spyder' can take the guess work out of calibrating your monitor.
Make sure your original images are backed-up and only work on copies of the original image.
Digital Photograph Workflow
A basic workflow might be something like this:
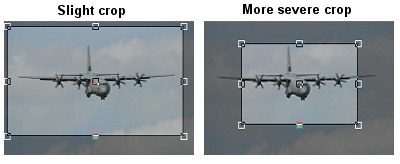
• CROP
• RE-SIZE
• ALTER BRIGHTNESS/CONTRAST
• SHARPEN
• SAVE
A more advance workflow might look like this:
• STRAIGHTEN IMAGE
• CROP
• RE-SIZE
• REMOVE DUST SPOTS
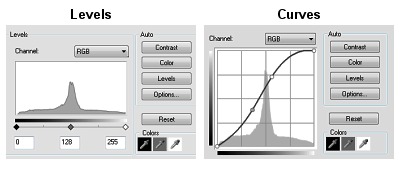
• LEVELS
• CURVES (if required)
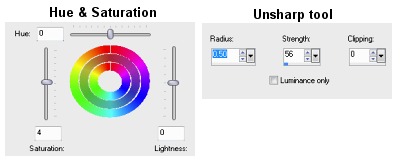
• HUE & SATURATION
• SHARPEN
• SAVE

 allows you to select just the part of the image that you want to keep and disposes of the rest.
Cropping is down to personal preference and you might want to crop the image to show the whole aircraft or crop just part of the aircraft for more of an arty photograph which shows more detail of the aircraft.
allows you to select just the part of the image that you want to keep and disposes of the rest.
Cropping is down to personal preference and you might want to crop the image to show the whole aircraft or crop just part of the aircraft for more of an arty photograph which shows more detail of the aircraft.
 This tool allows you to sample an area of the image near to the dust spot (right mouse button) and then clone that area (left mouse button) to cover the Dust-spot. The clone brush can be resized so it it covers the dust spot.
LEVELS:
If you are using Paint Shop Pro then select LEVELS (ADJUST menu, in 'Brightness and Contrast') or if you are using Photoshop Elements then select LEVELS (ENHANCE menu).
LEVELS shows three pointers/sliders underneath a histogram. The actual histogram represents the tonal range (contrast & colour balance) of the image with the left showing darkness, the right side showing lightness, and the middle showing mid-tones. LEVELS is a quick and easy way of quickly manipulating the image using sliders to get the desired exposure.